前言
用了将近两年的github pages功能当做自己的个人博客,可是最近发现,在急着想要用已经总结好的技术资料的时候,网速成了制约,github pages的打开速度,在国内有时候实在是惨不忍睹,由此萌生了把博客搬家回国内的想法。
OKR
虽然只是一个小小的迁移工作,也不妨制定一个OKR
OKR-1
O(目标):尽可能的采用小的成本来完成

KR(关键结果):使用阿里云最小最低配置的服务器来完成博客搭建
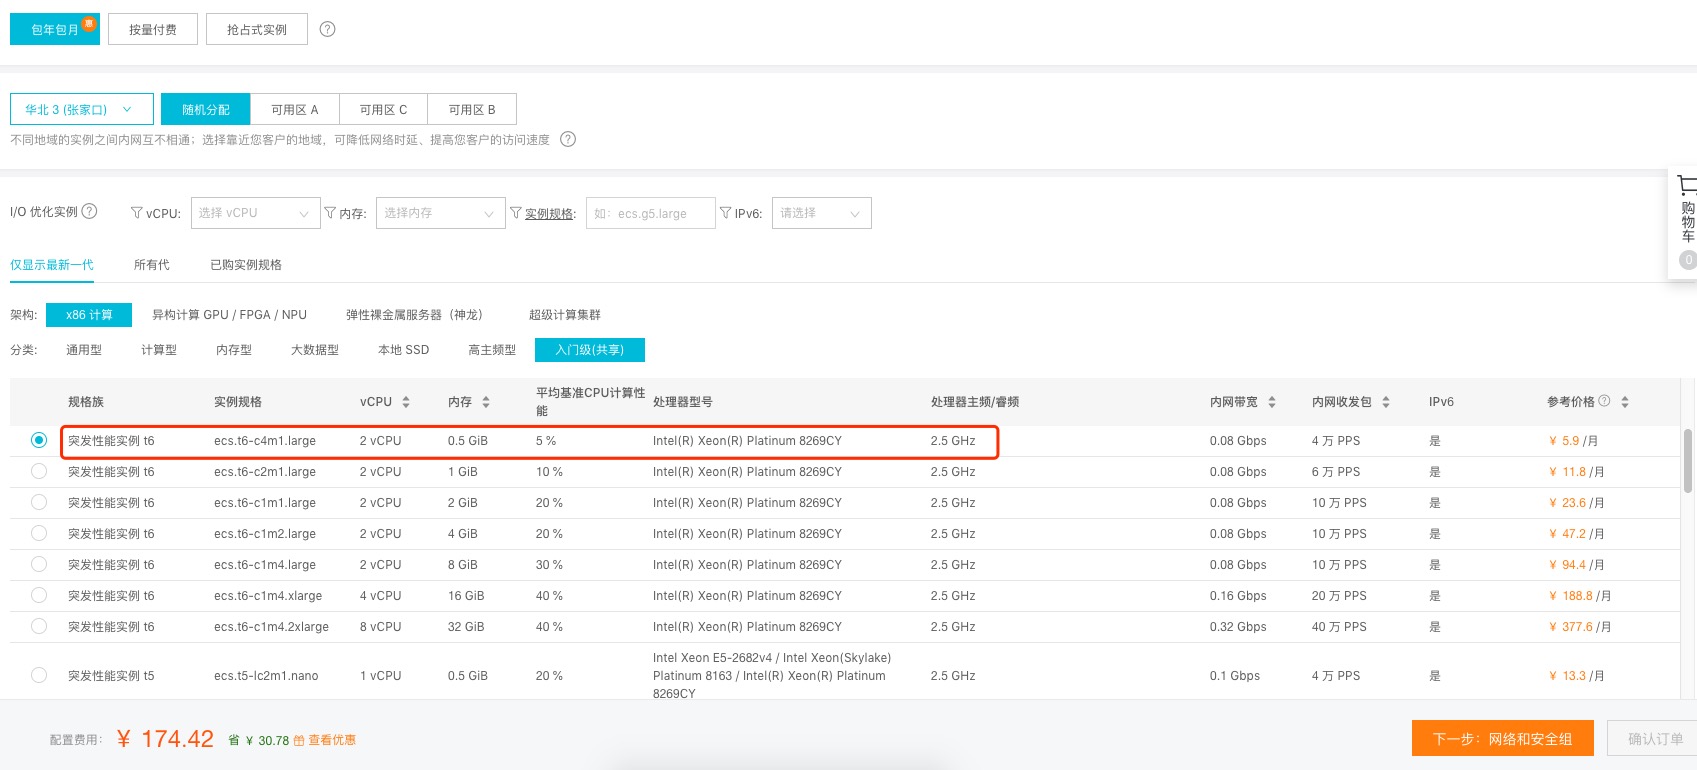
目前阿里云最低方案为:512M内存,双核且5%性能的VPS
OKR-2
O(目标):编写博客不能造成除写博客之外的工作量

KR(关键结果):除编写过程,其它过程全部采用自动化方案来实现
技术架构
技术架构图设计如下:
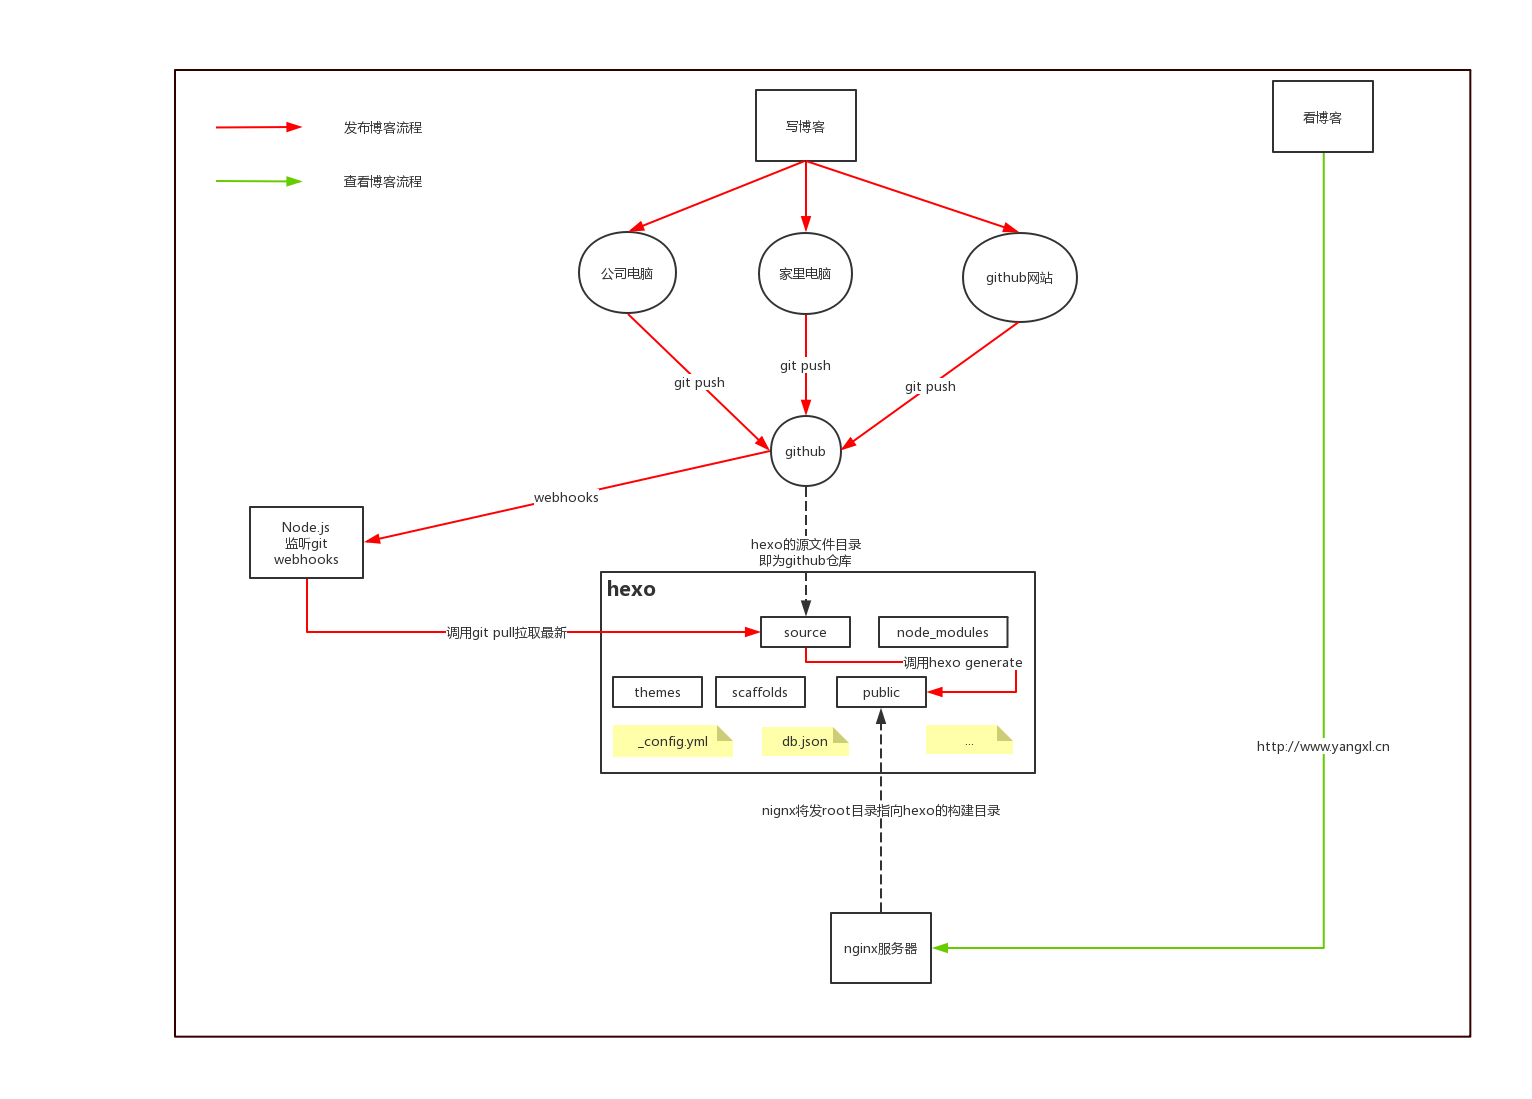
关键技术:
- 将hexo的源文件目录设置成github仓库,这样就能将博客通过github管理起来
- 用nginx将hexo的发布目录监听起来,这样hexo每次构建之后,ningx都可以及时访问
- github提供的webhooks是将所有流程串联起来的关键技术
- 自己用nodejs写一个简单的服务器,用来监听git webhooks(为了防止端口暴露,将此服务通过nginx proxy代理)
- 使用nodejs的shelljs来调用linux的shell命令
总结:编写博客 –> 提交到github –> github通知服务器 –> 服务器接收到通知 –> 调用git pull,将最新博客拉取到source –> 拉取成功后,调用hexo generate生成静态页面到public –> ningx监听public,用户访问到最新资源
相关源码
分析
nodejs写后台服务的话,首推成熟的框架koa,因此需要引入koa(node server)、koa-bodyparser(request body解析器,可以解析xml、json等格式)、koa-router(路由)
为了方便记录日志,引入log4js
为了输出美观,引入chalk
加密解码,使用crypto
划重点!!!nodejs操作linux shell的能力,全靠shelljs来提供,这个类库能够极大的节省我们的时间,让nodejs执行shell脚本编程一行代码就搞定的事儿
- 封装一个配置库,将可变的配置都提取出来
1
2
3
4
5
6
| // config.js
module.exports = {
targetDir: 'hexo所在的source目录',
port: 8888,
secret: '填写github上webhooks里填写的secret',
}
|
- 封装一个util类库
1
2
3
4
5
6
7
8
9
10
11
12
13
14
15
16
17
18
19
20
21
22
23
24
25
26
27
28
29
30
31
32
33
34
35
36
37
| // util.js
const log4js = require('log4js')
const chalk = require('chalk')
const crypto = require('crypto')
log4js.configure({
appenders: { access: { type: 'file', filename: './logs/access.log' } },
categories: { default: { appenders: ['access'], level: 'error' } }
})
// 将日志输出
const logger = log4js.getLogger('access')
// 封装日志
const log = (msg, color = 'limegreen') => {
logger.info(msg)
// eslint-disable-next-line no-console
console.log(chalk.keyword(color)(msg))
}
// 错误日志
const error = (msg, e, color = 'orangered ') => {
logger.error(msg)
// eslint-disable-next-line no-console
console.log(chalk.keyword(color)(msg), e)
}
const getKey = (secret, body) => {
try {
return 'sha1=' + crypto.createHmac('sha1', secret).update(JSON.stringify(body)).digest('hex');
} catch(e) {
error('校验secret失败', e)
}
return null;
}
module.exports = {
log, error, getKey
}
|
- 核心程序(因功能简单,所以就没有拆分模块化)
1
2
3
4
5
6
7
8
9
10
11
12
13
14
15
16
17
18
19
20
21
22
23
24
25
26
27
28
29
30
31
32
33
34
35
36
37
38
39
40
41
42
43
44
45
46
47
48
49
50
51
52
53
54
| // server.js
const Koa = require('koa')
const router = require('koa-router')()
const bodyParser = require('koa-bodyparser')
const shelljs = require('shelljs')
const { log, error, getKey } = require('./util')
const { targetDir, port, secret } = require('./config')
// 获取koa实例
const app = new Koa()
app.use(async (ctx, next) => {
log(`Process ${ctx.request.method} ${ctx.request.url}...`)
await next()
})
router.post('/git-hooks', async (ctx) => {
const { request, response } = ctx
const sig = request.headers['x-hub-signature']
const key = getKey(secret, request.body)
// 校验通过
if (sig === key) {
shelljs.cd(targetDir)
log(`切换到目录:${targetDir}`)
const generateCmd = shelljs.exec('hexo generate')
if (generateCmd.code === 0) {
log('网站构建成功')
ctx.response.body = {
code: 'success',
message: '网站构建成功'
};
} else {
error('网站构建失败', generateCmd.output)
ctx.response.body = {
code: 'error',
message: '网站构建失败'
}
}
} else {
error('网站构建失败')
ctx.response.body = {
code: 'error',
message: '权限校验失败'
}
}
})
// 添加body解析
app.use(bodyParser())
// 添加路由配置
app.use(router.routes())
// 启动监听端口
app.listen(port)
log(`应用程序已经启动,访问地址:http://127.0.0.1:${port}`)
|